前編
10回以上再インストールを余儀なくされた男のKubernetes構築手順 - 動かざることバグの如し
nfs-subdir-external-provisionerkube
metrics-server
kubernetes-dashboard
ArgoCD
一発で当てれる
kubernetes-manifests/argocd at master · thr3a/kubernetes-manifests
10回以上再インストールを余儀なくされた男のKubernetes構築手順 - 動かざることバグの如し
一発で当てれる
kubernetes-manifests/argocd at master · thr3a/kubernetes-manifests
kubernetes-dashboardをインストールするにあたってメトリクスを取る必要があるため
kubectl top nodesコマンドが使えるようになりたい。
# kubectl top nodes
error: Metrics API not available
公式サイトのREADME参照
kubectl apply -f https://github.com/kubernetes-sigs/metrics-server/releases/latest/download/components.yaml
なかなかREADYにならないのでログを見てみると、以下のようなエラーログが大量に出ている。
$ kubectl logs -n kube-system -l k8s-app=metrics-server --container metrics-server
E0724 00:32:10.210303       1 scraper.go:140] "Failed to scrape node" err="Get \"https://192.168.16.11:10250/metrics/resource\": x509: cannot validate certificate for 192.168.16.11 because it doesn't contain any IP SANs" node="ubuntu01"
E0724 00:32:10.217559       1 scraper.go:140] "Failed to scrape node" err="Get \"https://192.168.16.12:10250/metrics/resource\": x509: cannot validate certificate for 192.168.16.12 because it doesn't contain any IP SANs" node="ubuntu02"
E0724 00:32:10.294571       1 scraper.go:140] "Failed to scrape node" err="Get \"https://192.168.16.14:10250/metrics/resource\": x509: cannot validate certificate for 192.168.16.14 because it doesn't contain any IP SANs" node="ubuntu04"
E0724 00:32:10.499675       1 scraper.go:140] "Failed to scrape node" err="Get \"https://192.168.16.13:10250/metrics/resource\": x509: cannot validate certificate for 192.168.16.13 because it doesn't contain any IP SANs" node="ubuntu03"
I0724 00:32:13.045420       1 server.go:187] "Failed probe" probe="metric-storage-ready" err="no metrics to serve"
I0724 00:32:23.046614       1 server.go:187] "Failed probe" probe="metric-storage-ready" err="no metrics to serve"
E0724 00:32:25.209840       1 scraper.go:140] "Failed to scrape node" err="Get \"https://192.168.16.11:10250/metrics/resource\": x509: cannot validate certificate for 192.168.16.11 because it doesn't contain any IP SANs" node="ubuntu01"
E0724 00:32:25.223995       1 scraper.go:140] "Failed to scrape node" err="Get \"https://192.168.16.14:10250/metrics/resource\": x509: cannot validate certificate for 192.168.16.14 because it doesn't contain any IP SANs" node="ubuntu04"
E0724 00:32:25.230216       1 scraper.go:140] "Failed to scrape node" err="Get \"https://192.168.16.12:10250/metrics/resource\": x509: cannot validate certificate for 192.168.16.12 because it doesn't contain any IP SANs" node="ubuntu02"
E0724 00:32:25.530773       1 scraper.go:140] "Failed to scrape node" err="Get \"https://192.168.16.13:10250/metrics/resource\": x509: cannot validate certificate for 192.168.16.13 because it doesn't contain any IP SANs" node="ubuntu03"
公式READMEにもある通り、
Kubelet certificate needs to be signed by cluster Certificate Authority
とある。なんで内部通信なのに証明書用意しなきゃいけないんだよってことで「--kubelet-insecure-tls」を起動パラメータに追加してエラーを殺す。
以下で編集し、
$ kubectl edit deploy metrics-server -n kube-system
以下の通りに編集して保存
spec:
  containers:
  - args:
    - --cert-dir=/tmp
    - --secure-port=4443
-    - --kubelet-preferred-address-types=InternalIP,ExternalIP,Hostname
+    - --kubelet-preferred-address-types=InternalIP
+    - --kubelet-insecure-tls
    - --kubelet-use-node-status-port
    - --metric-resolution=15s
でpodを再起動すればREADYになるはず
$ kubectl logs -n kube-system -l k8s-app=metrics-server --container metrics-server
I0728 12:50:00.736910       1 shared_informer.go:240] Waiting for caches to sync for client-ca::kube-system::extension-apiserver-authentication::client-ca-file
I0728 12:50:00.737024       1 configmap_cafile_content.go:201] "Starting controller" name="client-ca::kube-system::extension-apiserver-authentication::requestheader-client-ca-file"
I0728 12:50:00.737127       1 shared_informer.go:240] Waiting for caches to sync for client-ca::kube-system::extension-apiserver-authentication::requestheader-client-ca-file
I0728 12:50:00.737751       1 dynamic_serving_content.go:131] "Starting controller" name="serving-cert::/tmp/apiserver.crt::/tmp/apiserver.key"
I0728 12:50:00.737880       1 secure_serving.go:266] Serving securely on [::]:4443
I0728 12:50:00.738133       1 tlsconfig.go:240] "Starting DynamicServingCertificateController"
W0728 12:50:00.738336       1 shared_informer.go:372] The sharedIndexInformer has started, run more than once is not allowed
I0728 12:50:00.837096       1 shared_informer.go:247] Caches are synced for client-ca::kube-system::extension-apiserver-authentication::client-ca-file
I0728 12:50:00.837115       1 shared_informer.go:247] Caches are synced for RequestHeaderAuthRequestController
I0728 12:50:00.837335       1 shared_informer.go:247] Caches are synced for client-ca::kube-system::extension-apiserver-authentication::requestheader-client-ca-file
topリソースが使えるようになってた
$ kubectl top nodes
NAME       CPU(cores)   CPU%   MEMORY(bytes)   MEMORY%
ubuntu01   282m         3%     2154Mi          31%
ubuntu02   183m         1%     2702Mi          37%
ubuntu03   124m         3%     2311Mi          29%
ubuntu04   325m         8%     2218Mi          62%
apt install -y docker-ce でDockerをインストールすると自動的にiptablesが追加される。
# iptables -L
Chain INPUT (policy ACCEPT)
target     prot opt source               destination

Chain FORWARD (policy ACCEPT)
target     prot opt source               destination

Chain OUTPUT (policy ACCEPT)
target     prot opt source               destination
Chain INPUT (policy ACCEPT)
target     prot opt source               destination

Chain FORWARD (policy ACCEPT)
target     prot opt source               destination
DOCKER-USER  all  --  anywhere             anywhere
DOCKER-ISOLATION-STAGE-1  all  --  anywhere             anywhere
ACCEPT     all  --  anywhere             anywhere             ctstate RELATED,ESTABLISHED
DOCKER     all  --  anywhere             anywhere
ACCEPT     all  --  anywhere             anywhere
ACCEPT     all  --  anywhere             anywhere
ACCEPT     all  --  anywhere             anywhere             ctstate RELATED,ESTABLISHED
DOCKER     all  --  anywhere             anywhere
ACCEPT     all  --  anywhere             anywhere
ACCEPT     all  --  anywhere             anywhere

Chain OUTPUT (policy ACCEPT)
target     prot opt source               destination

Chain DOCKER (2 references)
target     prot opt source               destination

Chain DOCKER-ISOLATION-STAGE-1 (1 references)
target     prot opt source               destination
DOCKER-ISOLATION-STAGE-2  all  --  anywhere             anywhere
DOCKER-ISOLATION-STAGE-2  all  --  anywhere             anywhere
RETURN     all  --  anywhere             anywhere

Chain DOCKER-ISOLATION-STAGE-2 (2 references)
target     prot opt source               destination
DROP       all  --  anywhere             anywhere
DROP       all  --  anywhere             anywhere
RETURN     all  --  anywhere             anywhere

Chain DOCKER-USER (1 references)
target     prot opt source               destination
RETURN     all  --  anywhere             anywhere
セキュリティ上 iptablesを変更させたくない場合は /etc/docker/daemon.json にて
{
  "iptables": false
}
にして systemctl restart docker をするとリセットされる
参考リンク先でも言及されてるが、目的がローカル以外に晒したくない場合は
docker run -d -p 127.0.0.1:3306:3306 mysql
のようにバインドするIPを制限すること
最近ハマってる、おうちKubernetesのコントロールプレーン用物理サーバーがほしいなと思い、安いNUCを探していたところこんな記事を発見
NUC11ATKは11世代のIntelCPUのベアボーンNUCで、簡単なスペックは以下
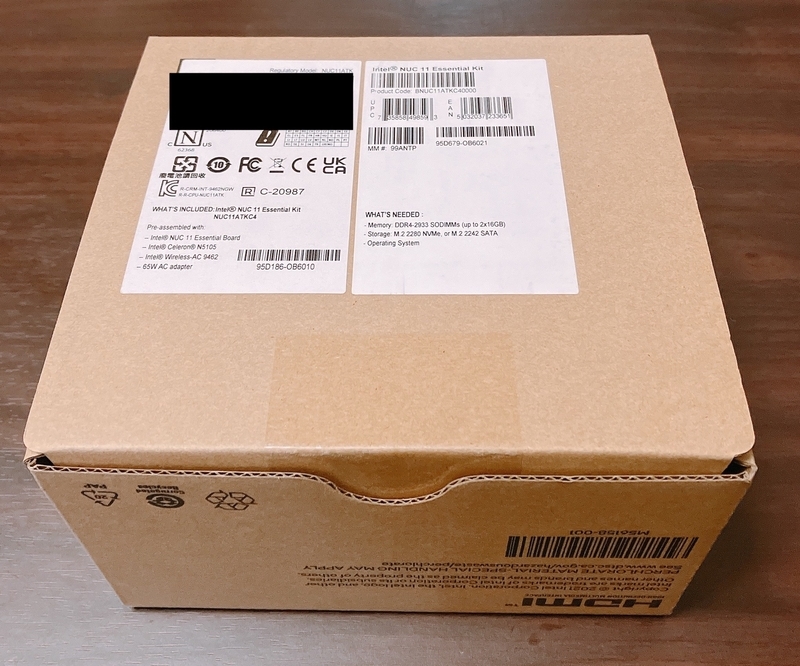
今回は余ってたメモリとM2 SSDディスクがあったのでベアボーンタイプの「BNUC11ATKC40000」をパソコン工房で22,800円で購入した。
デジタルサイネージとかビジネス用途を想定してるっぽくて箱はかなり質素
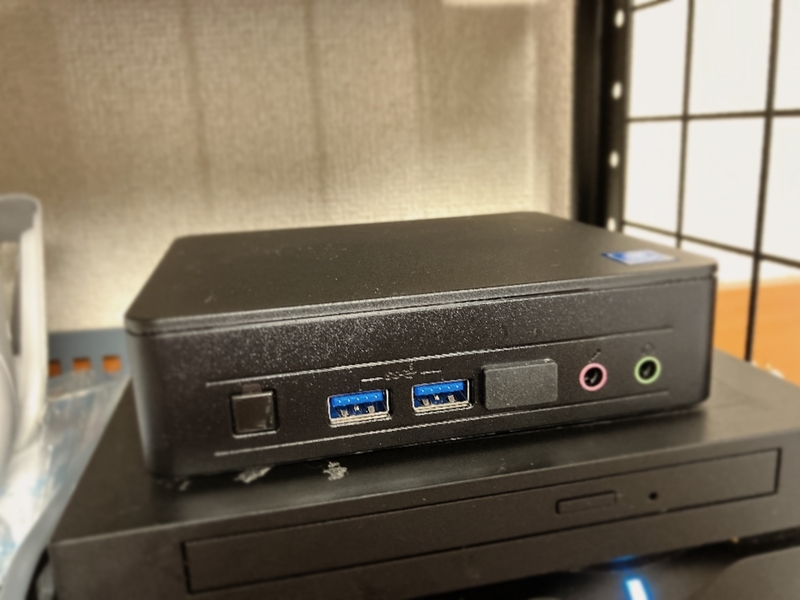
大きさはこんな感じ かなり小さい スマホはiPhone6s

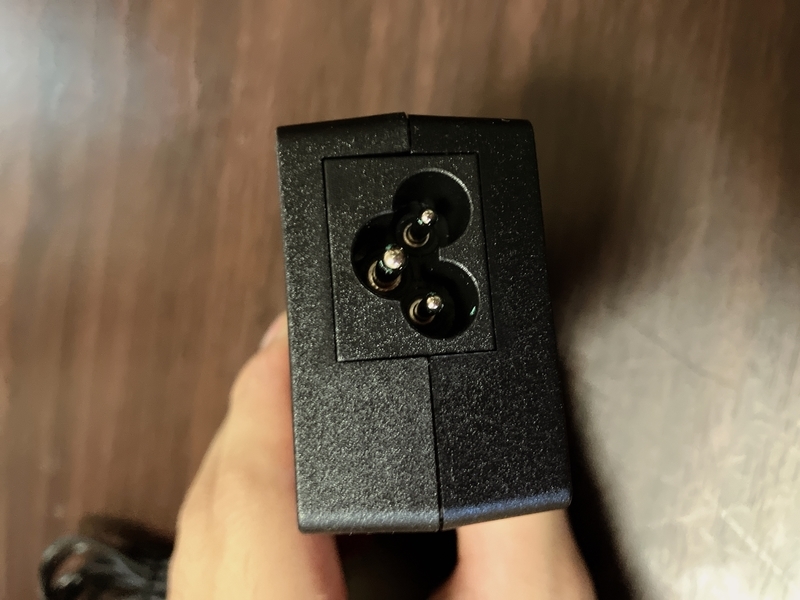
これは最近のINTEL NUC全般の注意点だが、なんと電源ケーブルが入っていない。
一般的なメガネ型コードだが3点の方なので家になかったら追加で買わなくてはいけない。
正確に言うと、新しい世代のNUCのせいなのかドライバがない
面倒だな。。。とか思ってたらなんとIntelの機器に特化したUbuntuイメージが公式で出ているとのこと。
ダウンロードはここからできる
Download Ubuntu for Intel IoT platforms | Download | Ubuntu
ダメ元で試したらディスプレイもWifiもバッチリ使えるようになってた。オススメ
LoadBalancerも悪くないけどIP1つ消費してしまうしせっかくならistioに統合させたかったのでメモ
ArgoCDはhttps通信必須なのでSSL証明書が必要 今回はオレオレ証明書で代用する
10年分のお買い得オレオレ証明書発行
openssl req -nodes -newkey rsa:2048 -keyout server.key -out server.csr -subj "/C=JP/ST=Hokkaido/L=Sapporo/O=Example INC./OU=IT Department/CN=*.turai.work"
openssl x509 -req -days 3650 -in server.csr -signkey server.key -out server.crt
istioに渡す
kubectl create -n istio-system secret generic oreore-turaiwork-credential \
  --from-file=key=server.key \
  --from-file=cert=server.crt
次に argocd-serverの起動パラメータに --insecure を追加する必要がある
$ kubectl -n argocd patch deployment argocd-server -p '
{
  "spec": {
    "template": {
      "spec": {
        "containers": [
          {
            "name": "argocd-server",
            "command": ["argocd-server","--insecure"]
          }
        ]
      }
    }
  }
}'
kubectl -n argocd edit svc argocd-server
spec内の443の通信の名前を「https」から「grpc」に変更する
spec:
  ports:
  - name: http
    port: 80
    protocol: TCP
    targetPort: 8080
  - name: grpc
    port: 443
    protocol: TCP
    targetPort: 8080
https://argocd.turai.work でアクセスできるようにさせる例 credentialNameは作成したSecretの名前(今回だとoreore-turaiwork-credential)を変えておく
apiVersion: networking.istio.io/v1beta1
kind: Gateway
metadata:
  name: argocd-gw
  namespace: argocd
spec:
  selector:
    istio: ingressgateway
  servers:
    - hosts:
        - argocd.turai.work
      port:
        name: http
        number: 80
        protocol: HTTP
      tls:
        httpsRedirect: true
    - hosts:
        - argocd.turai.work
      port:
        name: https
        number: 443
        protocol: HTTPS
      tls:
        mode: SIMPLE
        credentialName: oreore-turaiwork-credential
---
apiVersion: networking.istio.io/v1beta1
kind: VirtualService
metadata:
  name: argocd-vsvc
  namespace: argocd
spec:
  gateways:
    - argocd-gw
  hosts:
    - argocd.turai.work
  http:
    - name: grpc
      match:
        - headers:
            user-agent:
              prefix: argocd-client
      route:
        - destination:
            host: argocd-server
            port:
              number: 443
    - name: http
      route:
        - destination:
            host: argocd-server
            port:
              number: 80
昨今のChromeだとオレオレ証明書が厳しくなってMac側の設定しないとアクセスできない(Safariは可
Mac Chromeでプライバシーブロックされ「詳細設定」からもページが表示できない - Qiita
再構築するとき一発でできたほうがいいなと思ったのでkustomization.ymlに変更した 変更の中身は上記と同じ
kubernetes-manifests/kustomization.yml at master · thr3a/kubernetes-manifests

・2Pプラグ 1m KB-DM3S-1")